Basic Set Up
Add Files
Place a link to jQuery and the jquery.sequence-min.js file in the <head> of your document:
<script src="//ajax.googleapis.com/ajax/libs/jquery/1.9.1/jquery.min.js"></script>
<script src="scripts/jquery.sequence-min.js"></script>
Currently Sequence supports jQuery 1.7.1 – 1.9.1. Other versions of jQuery have not been/are yet to be tested.
Initiate Sequence
Once you’ve added the necessary files for Sequence, within the </head><head> of your document, inititate an instance of Sequence like so:
<script type="text/javascript">
    $(document).ready(function(){
        var sequence = $("#sequence").sequence().data("sequence");
    });
</script>
Let’s break this down:
Firstly, you have saved an instance of Sequence into a variable (var) called sequence. The variable name is entirely up to you and, if necessary, will allow you to interact with Sequence via custom JavaScript which is explained in the Callbacks section.
After the variable name, you’ve specified a jQuery selector $("#sequence"), which is the element you want to act as the Sequence container. You will create a <div> in the HTML shortly with an ID of sequence.
The Sequence function .sequence(), will accept many options that allow for modifying how Sequence works. These options are explained in the Options section.
It is possible to place multiple instances of Sequence on the same page, like so:
<script type="text/javascript">
    $(document).ready(function(){
        var sequence = $("#sequence").sequence().data("sequence");
        var sequence2 = $("#sequence2").sequence().data("sequence");
    });
</script>
Finally, jQuery’s .data() function is used to allow Sequence to save particular information about its state as a data attribute. The argument passed to the .data() function should always be "sequence", regardless of how many Sequence instances you have on the page.
Add HTML
Add Sequence’s simple HTML structure like so:
<div id="sequence">
    <ul class="sequence-canvas">
        <li>
            <!--Frame 1 content here-->
        </li>
        <li>
            <!--Frame 2 content here-->
        </li>
        <li>
            <!--Frame 3 content here-->
        </li>
    </ul>
</div>
Sequence consists of a containing element with a unique ID of your choosing, and an unordered list <ul> with a required class of .sequence-canvas. The unordered list — referred to as the canvas — contains <li> elements — referred to as frames. Frames hold the content of your Sequence instance. More on the canvas and frames shortly.
Add Content
To add content to a frame, simply put HTML within each list item:
<div id="sequence">
    <ul class="sequence-canvas">
        <li>
            <div class="info1">
                <p>Frame 1</p>
            </div>
        </li>
        <li>
            <div class="info2">
                <p>Frame 2</p>
            </div>
        </li>
        <li>
            <div class="info3">
                <p>Frame 3</p>
            </div>
        </li>
    </ul>
</div>
Here you’ve added a <div> to each frame with unique classes. You will shortly write some CSS that will allow each <div> to animate in and out of the Sequence container.
Note: Each frame can contain as many elements as necessary. However, Sequence expects all top level elements to transition and may not function correctly if that is not the case.
Setup a No-JavaScript Fallback
In a small percentage of browsers, JavaScript may be disabled which is the technology Sequence is built upon. In this case, to prevent an empty container from showing, nominate a frame to be displayed by giving it a class of animate-in:
<div id="sequence">
    <ul class="sequence-canvas">
        <li class="animate-in">
            <div class="info1">
                <p>Frame 1 information</p>
            </div>
            <img class="my-image" src="my-image.jpg" alt="An image of me" />
        </li>
        <li>
            <div class="info2">
                <p>Frame 2 information</p>
            </div>
        </li>
        <li>
            <div class="info3">
                <p>Frame 3 information</p>
            </div>
        </li>
    </ul>
</div>
Here you’ve nominated the first frame to be displayed if JavaScript is disabled.
Sequence’s Canvas and Frames
The basic structure of Sequence is a container element, an unordered list <ul class="sequence-canvas"> (the canvas) and list items <li> (the frames), as shown below.
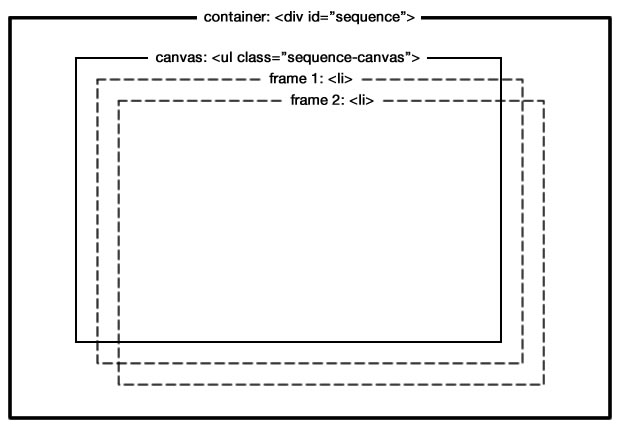
The container is used to define a width and height of your Sequence instance and is also used to append additional elements such as navigation and pagination.
When you come to style this basic structure in a moment, the canvas and frames will all be the same size as the container. The canvas holds your frames, of which, each sit on top of each other. When a frame is active, it will be given a higher z-index than the rest, so the active frame is always on top.
The frames will then hold your content. Sequence will expect any top level element within a frame to have a transition applied to it, which you’ll see shortly.
Note that any top level element within a frame is expected to transition (change at least one of its properties over a period of time). Sequence may not function correctly if this is not the case.
Creating an Animated Theme using CSS3
Setting up the Sequence Container and Frames
Start by styling the Sequence container:
#sequence {
    border: black solid 3px;
    height: 370px;
    margin: 10px auto;
    position: relative; /* required */
    width: 450px;
}
Here you’ve given the container some basic dimensional properties and a border. You’ve also given the container a relative position. This is a required declaration as all of the top level content elements within a frame will be given an absolute position, like so:
#sequence > .sequence-canvas li > * {  /* required */
    position: absolute;
}
This way, when you come to position elements within the container, top: 0 will be the top of the container, and left: 0 will be the left hand side of the container.
To make the canvas the same size as the container, add the following:
#sequence > .sequence-canvas { /* required */
    height: 100%;
    width: 100%;
}
Finally, add some declarations to each frame:
#sequence > .sequence-canvas > li { /* required */
    position: absolute;
    width: 100%;
    height: 100%;
    z-index: 1;
}
By making sure each frame has a z-index of 1, frames will stack on top of each other correctly. When a frame becomes active, Sequence will stack it on top of the rest by changing the z-index. This is particularly important when your slider has interactive elements such as links and buttons because it ensures those elements can be clicked/hovered over correctly.
How Sequence’s Animations Work
Each top level element within a frame will be animated by Sequence, but how that animation happens is entirely your choice and created using CSS3 transitions.
Note: All first level elements within a frame must have a CSS3 transition else Sequence may not function correctly.
By default, Sequence initially displays the first frame’s content, so start by animating the first element from the example above.
In the HTML, you’ve given the <div> a class of info1:
<li>
    <div class="info1">
        <p>Frame 1</p>
    </div>
</li>
This element is in its “start” position. Sequence will automatically add a class of animate-in to the frame, which will trigger the CSS3 transitions you will shortly write. The HTML will then look like this:
<li class="animate-in">
    <div class="info1">
        <p>Frame 1</p>
    </div>
</li>
When a frame is in its “animate-in” position, eventually it will need to be animated out (when the user presses the next button for example). Sequence will remove the animate-in class, and add a class of animate-out, which again, you can control via CSS3 transitions. The HTML will then look like this:
<li class="animate-out">
    <div class="info1">
        <p>Frame 1</p>
    </div>
</li>
This process is applied to each frame as and when that frame becomes active.
Once the last frame’s elements have reached the “animate-out” position, Sequence will go back to the first frame, remove the animate-out class (resetting the element to it’s starting position), and the whole process will continue indefinetly.
Demo: For a visual demonstration of how and when Sequence changes states, please see the documentation theme (which is the completed version of what you’re creating now).
Animating Backwards
Sequence contains options that allow for a user to control the animation of frames using next/previous buttons, the keyboard left/right arrow keys or swiping on touch devices. You can also make Sequence play in reverse via the developer options. Sequence will apply the above mentioned transitional phase classes in reverse.
Let’s assume frame 2 has one element that is currently in the “animate-in” position. If a user were to click a “previous” button, Sequence would remove the animate-in class, resetting the element to its starting position and the previous frame (frame 1), would be given the class of animate-out (resetting it to the “animate-out” position), followed by a class of animate-in to then make it transition into its “animate-in” position.
Animating Frame Elements using CSS3 Transitions
Now you know how Sequence works, you can manipulate the transition of frame elements using CSS3 transitions. Just before you begin adding transitional properties, style the <div> within each frame:
.info1,
.info2,
.info3 {
    background: #3f7ad6;
    color: white;
    height: 95px;
    padding: 5px;
    width: 95px;
}
Here you’ve made each <div> 95px wide and tall and given them a background colour. Now, begin applying transitional properties:
.info1 {
    left: -150px;
    top: 10px;
    -webkit-transition-duration: 1s;
    -moz-transition-duration: 1s;
    -o-transition-duration: 1s;
    -ms-transition-duration: 1s;
    transition-duration: 1s;
}
Remember that an element with no transitional phase class is in its “start” position. You’ve started this element 150px outside of the Sequence container (to the left), and 10px from the top.
Note #1: You’ve given the element a transition duration but, this is NOT the duration it will take to go from the “start” position to the “animate-in” position. Instead, it is the duration it will take to go from the “animate-in” position to the “start” position when Sequence is animating backwards.
Note #2: Sequence has been built to work across all modern browsers which means it is necessary to use vendor prefixes for CSS3 attributes such as transition-duration.
As you saw in How Sequence’s Animations Work, Sequence will add a class of animate-in to any active frame to make its elements transition to their “animate-in” position. So, style the transition between the “start” and “animate-in” positions:
.animate-in .info1 {
    left: 165px;
    -webkit-transition-duration: 1s;
    -moz-transition-duration: 1s;
    -o-transition-duration: 1s;
    -ms-transition-duration: 1s;
    transition-duration: 1s;
}
You’ve made it so that the <div> with class info1, will move from its “start” position of left: -150px, to left: 165px. You haven’t specified a top position so that will remain the same as the “start” position (top: 10px). By adding a transition-duration, the time it will take to go between the “start” and “animate-in” positions will be 1 second (1s). Again, you’ve used vendor prefixes to make the theme work across all modern browsers.
.animate-out .info1 {
    left: 500px;
    -webkit-transition-duration: 1s;
    -moz-transition-duration: 1s;
    -o-transition-duration: 1s;
    -ms-transition-duration: 1s;
    transition-duration: 1s;
}
Once all of the frame’s elements have finished animating in, Sequence will then change the animate-in class to animate-out. As you did with the “animate-in” transition, you’ve changed the left value to make the element move outside of the Sequence container and specified a 1 second (1s) transition duration.
From here on, you can apply transition durations to the remaining elements within the second and third frame. For the purpose of this demo and the sake of simplicity, you can modify the CSS you’ve just written to apply the same transition durations to the other frame elements, like so:
.info1,
.info2,
.info3 {
    left: -150px;
    top: 10px;
    -webkit-transition-duration: 1s;
    -moz-transition-duration: 1s;
    -o-transition-duration: 1s;
    -ms-transition-duration: 1s;
    transition-duration: 1s;
}
Here you’ve given start positions to the <div> elements within the second and third frames.
.info2 {
    top: 130px;
}

.info3 {
    top: 250px;
}
This CSS overwrites the top positions for each element so one is positioned below the next.
.animate-in .info1,
.animate-in .info2,
.animate-in .info3 {
    left: 165px;
    -webkit-transition-duration: 1s;
    -moz-transition-duration: 1s;
    -o-transition-duration: 1s;
    -ms-transition-duration: 1s;
    transition-duration: 1s;
}

.animate-out .info1,
.animate-out .info2,
.animate-out .info3 {
    left: 500px;
    -webkit-transition-duration: 1s;
    -moz-transition-duration: 1s;
    -o-transition-duration: 1s;
    -ms-transition-duration: 1s;
    transition-duration: 1s;
}
And finally you’ve included the second and third <div> elements in your “animate-in” and “animate-out” transitional positions.
What you’ve learnt in this demonstration are the basics to creating an animated theme for Sequence. You should now be able to create your own theme. Keep reading though, Sequence boasts even more useful features to help you make a truly amazing and unique theme.
Options
Sequence comes with many options that allow you to easily control its features.
Specifying Options
As explained in Initiate Sequence, each instance of Sequence can be passed developer defined options that override Sequence’s default settings. Options are stored in an object passed to the .sequence() function, like so:
<script type="text/javascript">
    $(document).ready(function(){
        var options = {
            autoPlay: true,
            autoPlayDelay: 3000
        }
        var sequence = $("#sequence").sequence(options).data("sequence");
    });
</script>
Multiple instances of Sequence can be passed the same options:
<script type="text/javascript">
    $(document).ready(function(){
        var options = {
            autoPlay: true,
            autoPlayDelay: 3000
        }
        var sequence = $("#sequence").sequence(options).data("sequence");
        var sequence2 = $("#sequence2").sequence(options).data("sequence");
    });
</script>
Or differing options:
<script type="text/javascript">
    $(document).ready(function(){
        var options = {
            autoPlay: true,
            autoPlayDelay: 3000
        }

        var options2 = {
            autoPlay: false,
            autoPlayDelay: 5000
        }
        var sequence = $("#sequence").sequence(options).data("sequence");
        var sequence2 = $("#sequence2").sequence(options2).data("sequence");
    });
</script>
List of Options
The following is the complete set of options implemented within Sequence:
General Options
startingFrameID
Type: A number, Default: 1
The frame (the list item <li>) that should first be displayed when Sequence loads.
cycle
Type: true/false, Default: true
Whether Sequence should navigate to the first frame after the last frame and vice versa.
true: When a user navigates forward from the last frame, Sequence will go to the first frame. Likewise, when a user navigates backwards from the first frame, Sequence will go to the last frame.false: When a user navigates forward from the last frame or backwards from the first frame, Sequence will not go to another frame.
animateStartingFrameIn
Type: true/false, Default: false
Whether the first frame should animate in to its active position.
true: The starting frame will begin in its “start” position and move to its “animate-in” position when Sequence loads.false: The starting frame will begin in its “animate-in” position when Sequence loads.
transitionThreshold
Type: true/false or a number representing milliseconds, Default: false
Whether there should be a delay between a frame animating out and the next animating in.
true: the next frame will not animate in until the current frame has completely animated out.false: the next frame will animate in at the same time as the current frame animating out.- A number: The amount of milliseconds to wait after animating the current frame out, before the next frame is animated in.
reverseAnimationsWhenNavigatingBackwards
Type: true/false, Default: true
Whether animations should be reversed when a user navigates backwards by clicking a previous button/swiping/pressing the left key.
true: when navigating backwards, Sequence will animate the preceding frame from its “animate-out” position to its “animate-in” position (creating a reversed animation).false: when navigating backwards, Sequence will animate the preceding frame from its “start” position to its “animate-in” position (as it does when navigating forwards).
preventDelayWhenReversingAnimations
Type: true/false, Default: false, Dependencies: reverseAnimationsWhenNavigatingBackwards: true
Assuming the total duration (the greatest transition-duration plus the greatest transition-delay) for an animation to complete in frame 2 is 1 second greater than frame 1, when the user navigates from frame 2 to frame 1 and reverseAnimationsWhenNavigatingBackwards is true, Sequence will apply that 1 second difference to frame 1 as a transition-delay. By doing this, Sequence creates a perfect reversal of animation. However, this delay may be bad for user experience because the users action won’t immediately create an on-screen event. To avoid this, set preventDelayWhenReversingAnimations to true.
moveActiveFrameToTop
Type: true/false, Default: true
Whether a frame should be given a higher z-index than other frames whilst it is active, to bring it above the others.
true: an active frame will be given az-indexvalue the same as the number of frames in the Sequence instance (bringing it to the top).false: frames will not have az-indexapplied to them.
Autoplay Options
autoPlay
Type: true/false, Default: false
Cause Sequence to automatically change between frames over a period of time, as defined in autoPlayDelay.
true: Sequence will automatically animate from frame to frame with a delay between each frame (specified using theautoPlayDelayoption).false: Sequence will display the starting frame until a user chooses to navigate Sequence using next/previous buttons, swiping, etc.
autoPlayDirection
Type: a number (1 = forward, -1 = reverse), Default:1, dependencies: autoPlay: true
The direction in which Sequence should auto play.
1: Sequence will navigate forwards, from frame to frame whilst autoPlay istrue, providing Sequence is not paused.-1: Sequence will navigate backwards, from frame to frame whilst autoPlay istrue, providing Sequence is not paused.
autoPlayDelay
Type: a number representing milliseconds, Default: 5000, dependencies: autoPlay: true
The duration in milliseconds at which frames should remain on screen before animating to the next.
Navigation Skipping Options
navigationSkip
Type: true/false, Default: true
Whether the user can navigate through frames before each frame has finished animating.
true: the user can navigate to another frame whilst the current one is mid animationfalse: the user is prevented from navigating to another frame whilst the current one is mid animation
navigationSkipThreshold
Type: a number representing time in milliseconds, Default: 150, dependencies: navigationSkip: true
Amount of time that must pass before the next frame can be navigated to. Example, if the user hits the next button, a period of 150ms (by default) must pass before they can navigate to another frame.
fadeFrameWhenSkipped
Type: true/false, Default: true, dependencies: navigationSkip: true
If a frame is skipped before it finishes animating, cause it to fade out over a specific period of time (see fadeFrameTime).
fadeFrameTime
Type: a number representing time in milliseconds, Default: 250, dependencies: navigationSkip: true and fadeFrameWhenSkipped: true
How quickly a frame should fade out when skipped (in milliseconds).
preventReverseSkipping
Type: true/false, Default: false, dependencies: navigationSkip: true
Whether the user can change the direction of navigation during frames animating (if navigating forward, the user can only skip forwards when other frames are animating).
Next/Previous Button Options
nextButton
Type: true/false or a CSS selector, Default: false
Defines a button that when clicked, causes the current frame to animate out and the next to animate in.
true: use a next button with the default CSS selector (.sequence-next).false: don’t use a next button.- CSS Selector: Specify a CSS selector to an HTML element you have manually added to the document.
showNextButtonOnInit
Type: true/false, Default: true, dependencies: nextButton: true
true: shown the next button as soon as Sequence is initiated.false: the next button won’t be shown when Sequence is initiated (you may like to hide the button initially to fade the button in using CSS for example).
prevButton
Type: true/false or a CSS selector, Default: false
Defines a button that when clicked, causes the current frame to animate out and the previous to animate in.
true: use a previous button with the default CSS selector (.sequence-prev).false: don’t use a previous button.- CSS Selector: Specify a CSS selector to an HTML element you have manually added to the document.
showPrevButtonOnInit
Type: true/false, Default: true, Dependencies: prevButton: true
true: shown the previous button as soon as Sequence is initiated.false: the previous button won’t be shown when Sequence is initiated (you may like to hide the button initially to fade the button in using CSS for example).
Pause Options
pauseButton
Type: true/false or a CSS selector, Default: false, Dependencies: autoPlay: true
A CSS selector that, when clicked, causes Sequence to pause the autoPlay feature.
true: use a pause button with the default CSS selector (.sequence-pause).false: don’t use a pause button.- CSS Selector: Specify a CSS selector to an HTML element you have manually added to the document.
unpauseDelay
Type: a number representing time in milliseconds, Default: same value as autoPlayDelay, Dependencies: autoPlay: true and pauseButton: true or pauseButton: "<css selector>"
The time Sequence should wait before starting autoPlay again once the user unpauses Sequence. The default value is the same as autoPlayDelay.
pauseOnHover
Type: true/false, Default: true, dependencies: autoPlay: true
Whether frames should stop auto playing when the user hovers over Sequence. autoPlay will continue again when the user moves their cursor outside of Sequence.
pauseIcon
Type: true/false or a CSS selector, Default: false, Dependencies: autoPlay: true
Display a pause icon when the user hovers over Sequence.
true: use a pause icon with the default CSS selector (.sequence-pause-icon).false: don’t display a pause icon.- CSS Selector: Specify a CSS selector to an HTML element you have manually added to the document.
showPauseButtonOnInit
Type: true/false, Default: true, dependencies: pauseButton: true
true: shown the pause button as soon as Sequence is initiated.false: the pause button won’t be shown when Sequence is initiated (you may like to hide the button initially to fade the button in using CSS for example).
Pagination Options
pagination
Type: true/false or a CSS selector, Default: false
Pagination associates child elements within the pagination selector (.sequence-pagination by default) to each frame of Sequence. When a child element is clicked, Sequence will navigate to the frame that is associated with that child element. If pagination is true, the following HTML can be included in your document to act as pagination:
<ul class="sequence-pagination">
    <li>Frame 1</li>
    <li>Frame 2</li>
    <li>Frame 3</li>
</ul>
When the first <li> element is clicked, Sequence will navigate to its first frame. When the second is clicked, Sequence will navigate to its second frame, and so on.
The pagination and pagination children can consist of any element. So, if you’d prefer, you could use <div> elements instead of <ul> and <li> elements.
When a Sequence frame is navigated to (via any navigation method, such as clicking pagination links, pressing a keyboard key etc), the associated pagination link will be given a class of current, so you can style the current pagination link as you wish:
HTML:
<ul class="sequence-pagination">
    <li>Frame 1</li>
    <li class="current">Frame 2</li>
    <li>Frame 3</li>
</ul>
CSS:
.sequence-pagination .current {
    font-weight: bold;
}
true: Use pagination with the default CSS selector (.sequence-pagination).false: don’t use pagination.- CSS Selector: Specify a CSS selector to an HTML element you have manually added to the document.
showPaginationOnInit
Type: true/false, Default: true, dependencies: pagination: true
true: shown pagination as soon as Sequence is initiated.false: the pagination won’t be shown when Sequence is initiated (you may like to hide pagination initially to fade it in using CSS for example).
Preloader Options
preloader
Type: true/false or a CSS selector, Default: false
true: Use the preloader and styles with the CSS selector (.sequence-preloader).false: don’t use a preloader.- CSS Selector: Specify a CSS selector to an HTML element you have manually added to the document.
If using preloader: true, the following default preloading HTML and CSS will be applied to the document:
HTML:
<div class="sequence-preloader">
    <svg class="preloading" xmlns="http://www.w3.org/2000/svg">
        <circle class="circle" cx="6" cy="6" r="6"></circle>
        <circle class="circle" cx="22" cy="6" r="6"></circle>
        <circle class="circle" cx="38" cy="6" r="6"></circle>
    </svg>
</div>
CSS:
.sequence-preloader {
    height: 100%;
    position: absolute;
    width: 100%;
    z-index: 999999;
}

@keyframes preload {
    0%{
        opacity: 1;
    }

    50%{
        opacity: 0;
    }

    100%{
        opacity: 1;
    }
}

.sequence-preloader .preloading .circle {
    fill: #ff9442;
    display: inline-block;
    height: 12px;
    position: relative;
    top: -50%;
    width: 12px;
    animation: preload 1s infinite;
}

.preloading {
    display: block;
    height: 12px;
    margin: 0 auto;
    top: 50%;
    margin-top: -6px;
    position: relative;
    width: 48px;
}

.sequence-preloader .preloading .circle:nth-child(2) {
    animation-delay: .15s;
}

.sequence-preloader .preloading .circle:nth-child(3) {
    animation-delay: .3s;
}

.preloading-complete {
    opacity: 0;
    visibility: hidden;
    transition-duration: 1s;
}

div.inline{
    background-color: #ff9442;
    margin-right: 4px;
    float: left;
}
Note: Vendor prefixes are omitted from the above CSS for brevity but should be used for cross browser compatibility.
preloadTheseFrames
Type: An integer array containing a list of frame numbers, Default: [1], Dependencies: preloader: true
Specify which frames should have their images loaded before Sequence initiates. By default, images in the first frame are loaded before Sequence initiates.
The following example will load all images in frames 1 and 2:
preloadTheseFrames: [1,2]
preloadTheseImages
Type: A string array containing a list of image sources, Default: [], Dependencies: preloader: true
Specify which images should be loaded before Sequence initiates. By default, no individual images are loaded (note that all images in frame 1 load by default, as described in the preloadTheseFrames option).
The following example will load all images in frame 1 (via the preloadTheseFrames option), as well as an image from frame 2 and an image in the footer of the page:
preloadTheseFrames: [1],
preloadTheseImages: [
    "images/frame2image.png",
    "images/footer-logo.png"
]
Note: Only images on the page are preloaded. As yet, you can’t preload a background image applied via CSS.
hideFramesUntilPreloaded
Type: true/false, Default: true, Dependencies: preloader: true
Specify whether frames should be hidden during preloading and then shown afterwards.
true: hide frames until preloaded.false: don’t hide frames during preloading.
hidePreloaderUsingCSS
Type: true/false, Default: true, Dependencies: preloader: true
true: Sequence will add a CSS class ofpreloading-completeto the preloader element (.sequence-preloaderby default, unless you’ve used your own CSS selector with thepreloaderoption), allowing you to hide that preloader using a CSS3 transition. Example:.preloading-complete { display: none; opacity: 0; visibility: hidden; transition-duration: 1s; }
Note: Vendor prefixes are omitted from the above CSS for brevity but should be used for cross browser compatibility.
The above CSS will cause the preloader element to fade out over a 1 second duration and then become hidden.
hidePreloaderDelay
Type: a number representing time in milliseconds, Default: 0, Dependencies: preloader: true and hidePreloaderUsingCSS: true
The number of milliseconds to wait after the preloader has been hidden before initiating the first animation.
Keyboard Options
keyNavigation
Type: true/false, Default: true
Whether to allow the user to navigate between frames using the left and right arrow keys.
numericKeysGoToFrames
Type: true/false, Default: true
Whether Sequence should go to a specific frame when the user presses a numeric key. Pressing 1 goes to frame 1 etc.
keyEvents
Type: An object or false
The public Sequence method that should occur when the left or right arrow keys are pressed.
Currently, the public methods supported by this option are prev(), next() and pause().
- An object:
Example:
keyEvents {
    left: "prev",
    right: "next"
}
In this example, when the left keyboard key is pressed, Sequence’s public method prev() will be initiated. When the right keyboard key is pressed, the next() public method will be initiated.
false: no keyboard events
customKeyEvents
Type: An object, Default: no default
An object containing the keyCodes and public methods that should occur when certain keys are pressed.
Currently, the public methods supported by this option are prev(), next() and pause().
Example:
customKeyEvents {
    65: "prev", //a
    68: "next", //d
    83: "prev", //s
    87: "next" //w
}
In this example, when the ‘a’ and ‘s’ keys are pressed, Sequence will go to the previous frame. When ‘d’ and ‘w’ are pressed, Sequence will go to the next frame.
Touch Swipe Options
swipeNavigation
Type: true/false, Default: true
Whether to allow the user to navigate between frames by swiping left and right on touch enabled devices.
swipeThreshold
Type: A number representing pixels, Default: 20
The number of pixels that the user’s finger must move across before a swipe event is triggered.
The default of 20, means the user must move their finger at least 20 pixels before a swipe event is recognised.
swipePreventsDefault
Type: true/false, Default: false
true: when a user swipes their finger over an instance of Sequence, the page will be prevented from scrolling.false: the browser will will continue with it’s default behaviour when a swipe occurs.
Note: Be careful with this option if true, make sure the user can touch an area of the page that still allows them to scroll.
swipeEvents
Type: An object or false, Default: {left: "prev", right: "next", up: false, down: false}
The public Sequence method that should occur when the user swipes in a particular direction.
Currently, the public methods supported by this option are prev(), next() and pause().
Default object:
swipeEvents {
    left: "prev",
    right: "next",
    up: false,
    down: false
}
In this example, when the user swipes left, Sequence’s public method prev() will be initiated. When the user swipes right, the next() public method will be initiated. No event will occur when the user swipes up or down.
false: no swipe events.
Hash Tag Options
The hash tag options are to be used with Ben Alman’s jQuery HashChange plugin.
Please place a reference to the jQuery HashChange plugin above your reference to the Sequence plugin, like so:
<script type="text/javascript" src="//ajax.googleapis.com/ajax/libs/jquery/1.7.1/jquery.min.js"></script>
<script type="text/javascript" src="scripts/jquery.ba-hashchange.min.js"></script>
<script type="text/javascript" src="scripts/jquery.sequence-min.js"></script>
hashTags
Type: true/false, Default: false
true: when a frame is navigated to and becomes active, the hash tag will change to reflect the frames ID.
In the following example, when the second frame becomes active, the URL will be changed to end with the hashTag #second-frame. The name “second-frame” is taken from the list item’s ID attribute.
<div id="sequence">
    <ul>
        <li id="intro">
            <h2 class="title">Built using Sequence.js</h2>
        </li>
        <li id="second-frame">
            <h2 class="title animate-in">Super awesome!</h2>
        </li>
    </ul>
</div>
false: the hash tag will not change.
hashDataAttribute
Type: true/false, Default: false, Dependencies: hashTags: true
true: the hash tag name, will not be taken from the list item’s ID attribute but instead a data attribute called data-sequence-hashtag.
In the following example, when hashDataAttribute is true and the first frame becomes active, the URL will be changed to end with the hash tag #superAwesome.
<div id="sequence">
    <ul>
        <li id="intro" data-sequence-hashtag="superAwesome">
            <h2 class="title animate-in">Built using Sequence.js</h2>
        </li>
    </ul>
</div>
false: Use the ID attribute instead of the data attribute.
hashChangesOnFirstFrame
Type: true/false, Default: false, Dependencies: hashTags: true
Whether the hash tag should be changed when the first frame becomes active.
true: The hash tag will change as soon as the first frame reaches its “animate-in” position.false: The hash tag will not change when the first frame becomes active but will change for every other frame after that.
Fallback Theme for Legacy Browsers
The fallback theme options control Sequence when it is being viewed in browsers that do not support CSS3 transitions. Please see caniuse.com for CSS3 transition browser compatibility.
Specifying Fallback Theme Options
Fallback theme options are included in the options of each instance of Sequence, like so:
<script type="text/javascript">
    $(document).ready(function(){
        var options = {
            fallback: {
                theme: "slide",
                speed: 500
            }
        }
        var sequence = $("#sequence").sequence(options).data("sequence");
    });
</script>
Fallback Options
theme
Type: slide or fade, Default: slide
The name of the fallback theme to be used when the browser doesn’t support CSS3 transitions.
slide: Causes frames to slide left and right.fade: Causes a frame to fade out before the next fades in (note: due to poor support for opacity in Internet Explorer 8 and below it’s advised to use the “slide” theme instead).
speed
Type: a number representing milliseconds, Default: 500
The speed at which frames should transition when in a browser that does not support CSS3 transitions.
Callbacks
Callbacks allow you to execute custom JavaScript functions at specific key points.
Specifying Callbacks
By using the variable that the Sequence object is stored in, you can add custom code to Sequence’s callbacks, like so:
<script type="text/javascript">
    $(document).ready(function(){
        var options = {
            autoPlay: true,
            autoPlayDelay: 3000
        }
        var sequence = $("#sequence").sequence(options).data("sequence");

        sequence.beforeCurrentFrameAnimatesOut = function(){
            //add code to execute here, such as:
            alert("Do something before the CURRENT frame animates out");
        };

        sequence.beforeNextFrameAnimatesIn = function(){
            //add code to execute here, such as:
            alert("Do something before the NEXT frame animates in");
        };
    });
</script>
Complete List of Callbacks
The following is the complete set of callbacks implemented within Sequence:
paused()
Executes after Sequence’s autoPlay feature is paused
unpaused()
Executes after Sequence in unpaused and autoPlay resumes
beforeNextFrameAnimatesIn()
Executes before the next frame begins to animate in
afterNextFrameAnimatesIn()
Executes after the next frame has animated in (and becomes the current frame)
beforeCurrentFrameAnimatesOut()
Executes before the current frame begins to animate out
afterCurrentFrameAnimatesOut()
Executes after the current frame has animated out
afterLoaded()
Executes after Sequence has loaded
destroyed()
Executes once Sequence has finished being destroyed via the .destroy() function
Public Functions and Variables
Public methods are the functions and options that Sequence utilises, made available for developers to extend and enhance their particular implementation.
Public Methods
goTo(id, direction, ignoreTransitionThreshold)
Causes Sequence to animate to a specific frame.
Arguments:
id(required): a number corresponding to a frame (the first frame has an id of 1).direction(optional): whether the frame being animated to should be considered as being ahead or behind the current frame.- ‘ignoreTransitionThreshold’ (optional): if true, ignore the transitionThreshold setting and immediately go to the specified frame.
Specifying a direction value of 1 will change the current frame from the “animate-in” position, to “animate-out”, and the next frame will be changed from “start” to “animate-in”. A value of -1 will change the current frame from “animate-in” to the “start” position and the next frame will be changed from “animate-out” to “animate-in”.
If a “direction” is not specified, Sequence will consider a frame with a higher id than the current frame as being ahead of it (1), and frames with a lower id will be considered as being behind (-1).
Examples:
sequence.goTo(3, 1); //navigate forwards to frame 3
sequence.goTo(2, -1); //navigate backwards to frame 2
pause()
Dependencies: autoPlay: true
pause() will either pause or unpause Sequence’s autoPlay feature depending on its current state.
Example:
sequence.pause()
unpause()
Dependencies: autoPlay: true
unpause() will unpause Sequence’s autoPlay feature when paused.
Example:
sequence.unpause()
next()
Causes Sequence to animate to the next frame.
Example:
sequence.next()
prev()
Causes Sequence to animate to the previous frame.
Example:
sequence.prev()
startAutoPlay(delay)
Start Sequences auto play feature if not already active.
Arguments:
delay(optional): A number in milliseconds to wait before the autoPlay feature is started. If undefined, the delay will be the same asautoPlayDelay.
Example:
sequence.startAutoPlay(1000); //start Sequence's autoPlay feature after 1 second (1000 milliseconds).
stopAutoPlay()
Stop Sequence from auto playing.
Example:
sequence.stopAutoPlay()
destroy(navigation, callback)
Remove Sequence from the element it is hooked on to, along with events and other related elements such asnavigation.
Arguments:
navigation(optional): if false, Sequence won’t remove navigation elements such as next and previous button. Navigation elements will be removed by default.callback(optional): a callback to execute after the.destroy()function has finished. You can also use the public callback.destroyed().
Public Variables
Public variables can be used to get certain information about the state of Sequence, for example, the ID of the current frame.
Using Public Variables
Public variables can be taken from the variable the Sequence object is saved in to, like so:
alert(sequence.currentFrameID);
List of Public Variables
active
Type: true/false
Returns whether Sequence is currently animating
canvas
Type: Object
Returns the object for Sequence’s canvas element, the <ul>.
container
Type: Object
Returns the object for Sequence’s container element.
currentFrame
Type: Object
Returns the current frame object.
currentFrameID
Type: Number
Returns a number representing the current frames position in relation to all frames. 1 is the first frame.
direction
Type: Number
Returns the direction Sequence is currently animating in (1 = forward/-1 = reverse).
frames
Type: Object
Returns each of Sequence’s frames, the top level <li> elements.
hasTouch
Type: true/false
Returns true or false depending on whether the device has touch capabilities.
isBeingHoveredOver
Type: true/false
Returns true or false depending on whether the Sequence canvas is currently being hovered over.
isPaused
Type: true/false
Returns true or false depending on whether Sequence is paused (the autoPlay function is not active)
nextButton
Type: Object
Returns the next button object
nextFrame
Type: Object
Returns the next frame object (the next </li><li>)
nextFrameID
Type: Number
Returns a number representing the nextframes position in relation to all frames. 1 is the first frame.
numberOfFrames
Type: Number
Returns how many frames are in the Sequence container.
pauseButton
Type: Object
Returns the pause button object
pauseIcon
Type: Object
Returns the pause icon object
prefix
Type: Text
Returns the vendor prefix for the transition property of the browser Sequence is being viewed in, such as "-webkit-" or "" when the browser no longer requires a prefix for transition.
prevButton
Type: Object
Returns the previous button object
settings
Type: Object
Returns an object containing Sequence’s settings – the developer’s options merged with the defaults (note that the developer’s options take precedence over the defaults).
transitionsSupported
Type: true/false
Returns true or false depending on whether the browser supports CSS3 transitions.
Advanced Examples
The following are examples of advanced functionality you might like to use.
Initiating and Destroying Sequence (v0.9 onwards)
You may want to initiate and destroy Sequence as you require. For example, you may have several Sequence sliders on the same page but only want one to be active initially, then when the user clicks a button, destroy that first instance and initiate another. The following code allows you to do just that:
var options = {};           //your Sequence options, change as desired
var mySequence = undefined; //setup a public variable to contain your Sequence instances

function initSequence() {
    mySequence = $("#sequence").sequence(options).data("sequence"); //initiate Sequence

    mySequence.afterLoaded = function() {
        /* an example callback applied to the new instance of Sequence */
    }
}

$("#destroy").on('click', function() {  //when <div id="destroy"> is clicked...
    mySequence.destroy();               //destroy Sequence
    mySequence = undefined;             //clear the mySequence variable
});

$('#create').on('click', function() {   //when <div id="create"> is clicked...
    initSequence();                     //initiate a new instance of Sequence
});</div></div></li></ul></li></ul></div></li></css></li></div></div></div></div></div></div></li></ul></div></div></li></ul></div></head>